Saturday, October 15, 2016

Antares Launch from Wallops, Photo Op (Revised)


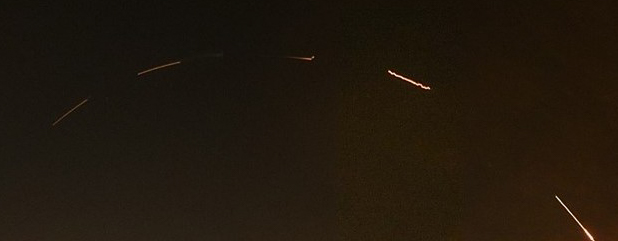
Antares Launch Viewed from Fairfax
Each track segment is a 15 second exposure at f/3.5, 50mm, ISO 100.
The large gap near the top is Antares coasting after first stage cutoff.

Revised 2016.10.20 to describe photo and to replace unfinished photo by final.

  • A total of 19 track segments comprise this image, including two blank segments during which Antares is coasting after first stage cutoff.   
  •          Cutoff occurred near the apparent peak of the trajectory.  About ¾ seconds after cutoff is a dimmer light lasting about 2 seconds, perhaps related to separation of the 1st and 2nd stages.
  • Second stage ignition occurred after the blank segment.  The first seconds of ignition appear brighter than the rest of the segment.   
  • The rocket rises high enough above the horizon that an observer in Fairfax does not require a clear view of the horizon to see most of the trajectory.   
  • A diagram of key launch events is available from http://spaceflightnow.com/2016/10/17/key-events-during-the-antares-rockets-climb-to-orbit/, courtesy of Orbital ATK.  

Revised 2016.10.17 AM to note the launch delay and 2016.10.17 PM to add image.

From the Antares "Launch Status" Blog: "Today’s launch of Orbital ATK’s Antares rocket is postponed  24 hours  due to a ground support equipment (GSE) cable that did not perform as expected during the pre-launch check out. We have spares on hand and rework procedures are in process. The Antares and Cygnus teams are not currently working any technical issues with the rocket or the spacecraft. The launch is now scheduled for October 17 at 7:40 p.m. EDT.

Revised 2016.10.16 to include references for future launch photography.

Depending upon whether we have clear skies, the nighttime launch of the Antares rocket from Wallops Island will be visible from Fairfax.  A view of the horizon is possible from a spot at the Pickett Shopping Center in Fairfax City, behind the Fedex on the delivery ramp, looking southeast over Route 236 heading toward Annandale.  The earliest launch time is this Sunday at 8:03 pm.

Original Post 2016.10.15

Attached is a photo taken three years ago with a point-and-shoot from the Fedex location of another launch from Wallops, a composite of 15-second exposures with a 15-second, noise-reducing dark screen between each exposure.  This launch was in an easterly direction, hence the rocket appears to be traveling right to left.  Today’s Antares launch will be in a southeasterly direction, so, since Wallops is southeast of us, the rocket may appear to be traveling almost straight up.

Visibility Map and Other Details
(Be aware of the mouse-over ads embedded in the double-underscored text of this site.)
http://www.space.com/34348-nighttime-private-rocket-launch-east-coast-visibility.html

Launch Status
http://www.nasa.gov/centers/wallops/home

Cloud Maps
Weather Underground WunderMap: https://www.wunderground.com/wundermap
Clear Sky Chart: http://www.cleardarksky.com/c/WashingtonDCkey.html

General Information
http://www.space.com


No Longer Available:
Infrared Satellite: https://www.wunderground.com/maps/us/IRSatellite.html
Visible Satellite: https://www.wunderground.com/maps/us/VisSatellite.html
Visibility: https://www.wunderground.com/maps/us/Visibility.htm
Zoom Satellite: https://www.wunderground.com/satellite/vis/1k/US.html


LADEE Launch from Wallops, Viewed from Fairfax, 2013.09.06


"Zoom Satellite" Image


LADEE Flight Path Viewed from The Lincoln Memorial


Photo Management: A Million Memories

Added "workaround" paragraph, 20170208

Photo management software is a Godsend for packrats like me.  It’s also valuable for anyone who wants to find a particular photo in their collection in seconds rather than minutes… or months.  The routine upfront work required to maintain such a managed database of photos is surprisingly minimal, at least from my experience using Adobe Lightroom as a photo manager.  The biggest challenge is deciding how to both “store” and “organize” one’s own photos.  To understand the difference, see the American Society of Media Photographers (ASMP) article on File Management, and particularly its “Storage vs. Organization” section, at

http://www.dpbestflow.org/file-management/file-management-overview

One thing to realize is that after spending years organizing tens of thousands of photos on one brand of photo management software, there may not be an easy way to fully migrate the “organizational” structure to the next best brand coming down the pike.  The geeky explanation and manually intensive workaround for this is below.

BTW, the Library of Congress funded the ASMP to document Digital Photography Best Practices and Workflow (dpBestflow®).  See their comprehensive best practices page at http://www.dpbestflow.org/links/32.  Though this was written for the professional, much is useful for the eager beginner and amateur.

Migrating from One Photo Management System to Another

Some of the organizational structure of a photo management database will be established via metadata, e.g., the photos of Aunt Betsy will not be contained in a folder named "Aunt Betsy," but within a folder structure based on simpler, unrelated storage hierarchies, e.g., by camera or date.  But Aunt Betsy’s photos will be quickly accessible via a metadata tag (a “keyword”) named "Aunt Betsy" which is known to the photo management system.  The keyword can also be written to the DNG, RAW sidecar and JPG files, but any keyword hierarchy information will be lost.  For example, one may establish within Lightroom a keyword hierarchy with "Aunt Betsy" beneath "Family;" but though the photo file will contain the tags "Family" and "Aunt Betsy," there is no standard method for the tags in those photo files to be associated hierarchically.  Thus, if one decides to migrate to a new photo management software system, the new system will recognize the keywords but may not present to the user a hierarchical representation (e.g., a "tree" structure like Microsoft Window's File Manager) of the keywords; in other words, Aunt Betsy may not “appear” to be part of the family. 

A workaround may not be possible, though I’m not sure.  Non-geeks, take a deep breath before reading this paragraph.  Lightroom indicates keyword hierarchy relationships with the “pipe” symbol, a vertical line, e.g., Family | Aunt Betsy (read as “Family pipe Aunt Betsy”) means the keyword “Aunt Betsy” is contained within the hierarchy space of the keyword “Family.”  The sequence “Family | Aunt Betsy” is stored in an image file’s metadata section, but it is stored as an Adobe-specific field; so unless another company’s photo management software recognizes the Adobe field, the hierarchy will be lost.  Here is an example of the field:

<lr:hierarchicalSubject>
    <rdf:Bag>
       <rdf:li>Family|Aunt Betsy</rdf:li>
    </rdf:Bag>
</lr:hierarchicalSubject>

Another major organizational structure of a photo management database is the association of photos with albums or collections.  In Lightroom a collection is not a metadata item associated with a photo; the user must specifically assign an “album name” as a keyword to a photo, just as he would assign any other keyword to a photo.  For example, 1,000 photos may contain the keywords “Riviera” and “Vacation.”  Ten of those photos may also contain “Aunt Betsy.”  One of Aunt Betsy’s photos may also be part of the album “Riviera Vacation Album, 201606.”  But to make sure that a migration to another photo management database system will succeed, each of the photos in the album, including the single one of Aunt Betsy, should also have a keyword with the same name as the album, namely, “Riviera Vacation Album, 201606.”


Thursday, October 6, 2016

Want to Capture a Blazing, Flaming Sunset Photo?

You have to know the right meteorological conditions, or have a neighbor who’s a meteorologist, or use a program written by a trio of meteorologists from Penn State.

The upcoming photo competition on textures got me to thinking about capturing the shading and coloration differences in clouds.  “Simple,” I said to myself, “just go outside and snap a sunset.”  The problem is that clouds put on wonderful light shows on their own schedules, which have not been published until now.  A little research uncovered a handy web site providing a map of the US, colored to indicate the probability of a “good” sunset (and sunrise).

Penn State News Article
http://news.psu.edu/story/385020/2015/12/15/academics/forecasting-beauty-student-alums-make-model-predict-vivid-sunsets

Sunset/rise Forecast Map
https://sunsetwx.com/


And for the geeky (and not so geeky) crowd, here are a few other interesting sites.

Great Photos and Explanations (zackiedawg, DPReview)
https://www.dpreview.com/forums/post/41028410

Techy Stuff on Clouds (Bruce Wunderlich, Digital Photography School)
http://digital-photography-school.com/predicting-dramatic-sunsets/

Cloud Type Graphic (helps one understand Wunderlich’s article, Wikipedia)
https://en.wikipedia.org/wiki/File:Cloud_types_en.svg

Happy Snapping!

Friday, September 2, 2016

Stage Photography, Post-Processing Trick

Have you ever tried capturing images in a small music club where the only lighting was from stage floods that were programmed to change colors?  I’ve spent hours fiddling with Lightroom adjustments of images from such venues till I’m 9,000K in the face, trying to create an acceptable photo.  Well, a commenter of a DPReview article (19 Tips for Better Live Music Photography) offered a simple tip: desaturate all the channels (but not to B&W) and increase the temperature dramatically.  It works!  No more spending five minutes customizing each of dozens of photos. 

Laurence Juber, March 31, 2016, Jammin' Java -- Before/After

Using Lightroom this photo was adjusted by lowering the saturation of all the color channels to about -50, raising the temperature to 12,155K and raising the Tint to +61.  The photo has no other changes such as tone or presence.   The commenter (dark goob) talked about doing this in-camera, but as you can see, it works in post on RAW files also.  Here are his words: “Set the cameras saturation down low (not all the way to B&W) and set the white balance manually to like 12,000K or something crazy, and you can make the reds not blow out the details right in your camera before you take the shot.” 

Thursday, August 18, 2016

Perseids, Anyone?

Working Document Added 20160823

Prepare to be underwhelmed.  And we can give up on ever seeing any meteor showers in our area -- too much light and particulate pollution.  My daughter-in-law had a good view of the showers from their ridge top abode near Front Royal, she may even have seen a fireball.  

View this album's photos in a dark room because most of the images replicate our star-washing light pollution.  And make sure the Information Panel is visible to see the photos' captions.  The panel appears when you click the "letter 'i' inside a circle" icon on the upper right of the screen.  

The Perseids Photo Album
https://goo.gl/photos/sWvjADFD5TfxMdxUA

The Perseids Working Document

Grossly Photoshopped image, to make trails visible on this blog.

Wednesday, June 29, 2016

Moonrise over Hernandez, Ansel Adams

As inspiration for our upcoming Landscape-themed photo shoots, DPReview notes the publication of “newly released footage” about the making of Moonrise over Hernandez. 

Would Ansel use Photoshop today?  You bet he would!  


Saturday, June 25, 2016

Depth of Field Graphs

DoFMaster is the grand-daddy of DoF calculators and tables.  But Nicholas V. Sushkin has developed an online system to generate DoF graphs that are much easier to use than DoF tables, though of course, not as precisely interpretable.  His web site is www.dof.pcraft.com (no longer active).  The file, DoF Graphs, CoC 0.019mm.pdf, available on OneDrive, contains a set of these charts for crop sensor systems with a 0.019 mm circle of confusion, and is suitable for viewing in the field on a cell phone.  A page extracted from the file is below. 


Monday, June 6, 2016

The Passing of Time, Caught in a Single Photo

 The first photograph, Joseph Nicéphore Niépce’s Courtyard, was an eight-hour exposure, showing a scene viewable only by observing it at multiple times during the day.  Stephen Wilkes’ methods demonstrate the latest evolution from that “requirement” of earlier technology: more than motion via slow exposure, more than time lapse… a quantization of time, if you will.  

 From the TED introduction: 

 "Photographer Stephen Wilkes crafts stunning compositions of landscapes as they transition from day to night, exploring the space-time continuum within a two-dimensional still photograph. Journey with him to iconic locations like the Tournelle Bridge in Paris, El Capitan in Yosemite National Park and a life-giving watering hole in heart of the Serengeti in this tour of his art and process."

http://www.ted.com/talks/stephen_wilkes_the_passing_of_time_caught_in_a_single_photo

Stephen Wilkes

Focus Stacking with Photoshop

20160827: Step 15 corrected.  

From Wikipedia: “Focus stacking (also known as focal plane merging and z-stacking[1] or focus blending) is a digital image processing technique which combines multiple images taken at different focus distances to give a resulting image with a greater depthof field (DOF) than any of the individual source images.[2][3] Focus stacking comes in handy for macro photography which, at high magnification, yields depths of field less than a millimeter.   
 
 There are two ways to photograph each focal plane: by physically moving the camera, and by using the lens’ focus ring.  Physically moving the camera requires a “rack” graduated to fractions of a millimeter, and the good racks cost several hundred dollars.  The focus ring method met my “beginner” requirements.  


 As it turns out, Photoshop (PS) makes the stacking of photos an easy three-phase process.  The following steps apply to PS CS v13, Extended.  

Phase 1: Load each image of the series into its own layer.  

1.    File > Automate > Photomerge
2.    Select the “Layout” as “Auto.”
3.    Turn off “Blend Images Together.”
4.    “Browse…” to load the images.
5.    Press “OK.”
6.    PS now loads the images into separate layers.
7.    When PS finishes Phase 1, proceed to Phase 2.   

Phase 2: Mask the well-focused portions of each image. 

8.     “Select” all the layers.
9.      Edit > Autoblend Layers.
10.    Select “Stack Images.”
11.    Select “Seamless Tones and Colors.”
12.    Press “OK.”
13.    PS now masks the in-focus portions of each image in all layers.
14.    When PS finishes Phase 2, proceed to Phase 3.  

Phase 3: Merge the masked layers into a single, focus-stacked image.  

15.    Layer > Merge Layers
16.    PS now merges the masks from each layer into a single layer.
17.    Save the image in the now merged, single layer as a TIFF.
18.    Voilà!
 

Friday, June 3, 2016

Metalenses: Photo Revolution

Update, 20170209: Flat metalenses now work with a range of colors
Update, 20180104: Metalenses now focus entire range of visible light
Update, 20181229: Findings published Oct 3, 2018 in Light: Science and Applications

Harvard researchers have invented a revolutionary and apparently inexpensive replacement for lenses used in the art and craft of photography, as well as in any field employing lenses for the visible spectrum.  Imagine you and your friends upgrading your ten-pound, $13K, Canon EF 800mm f/5.6L IS USM lenses to new lenses as thin as sheets of paper.  According to the Harvard SEAS news item, “[t]he authors have filed patents and are actively pursuing commercial opportunities.” 

References.


This electron microscope image shows the structure of the lens (white line is 0.002mm long) (BBC)
Scanning electron microscope micrograph of the fabricated meta-lens.  The lens consists of titanium dioxide nanofins on a glass substrate.  (Harvard SEAS)